
The Science of Cooking a Perfect Steak
A Case Study
Let’s apply what we have learned about food chemistry, food safety, temperature, heat, and water to the cooking of a popular ingredient: steaks.
For the novice cook, one of the most confusing and frustrating experiences is deciding when a piece of steak is done. There is the palm method, where you touch different fingers with your thumb, and the hardness of your palm in different configurations matches different doneness. Or (according to some) an easier method: the softness of different parts of your face corresponding to the different degrees of doneness. I am not going to give you the details of these methods because they don’t work: every person’s hand or face is different, every piece of steak is different, and do you really have a repeatable and accurate sense of touch?
Maybe you don’t care for steaks. But a rectangular piece of meat is a good (as in easy to model) subject for studying how temperature and heat work in cooking.
We will follow our foolproof 3-step program: define the problem, think very hard, and solve it!
The Problem Statement
First, let’s define what we mean by a well-cooked steak.
The basic building blocks of animal meat are myofilaments (protein cells), which bundle together to form myofibrils. This bundling of bundles goes on until muscles are formed. Around each of these bundles is a sheath of collagen. As the temperature rises to around 60°C, the collagens begin to contract and squeeze the moisture out of muscle cells. To keep your ribeye juicy, you want to keep the internal temperature of the steak under 60°C (140°F). As it turns out, 60°C is about the lowest temperature at which beef is safe to eat.
Water in the meat fiber is not the only reason the meat tastes juicy. When you bite into a piece of meat, there is that initial burst of meat juice. As you continue to chew, the fat and flavor in the meat stimulate the flow of your own saliva, which sustains the sensation of juiciness. A piece of bland, moist meat is not juicy. The distinctive flavors of seared steaks come from the Maillard reactions. Under high temperatures, the protein and sugar in the meat undergo a series of complicated reactions, producing hundreds of new molecules that result in intense flavors. These are called the Maillard reactions. They are some of the most important flavor-producing reactions in cooking. The Maillard reactions do happen at lower temperatures, but they accelerate at around 130°C. At that temperature, the water has evaporated. So the meat has to be dry where Maillard reactions happen. In other words, you want them to happen in part of your steak, but not too big a part.
To sum up, our problem statement becomes: we want a barely cooked interior and a browned crust. The ideal temperature distribution inside the steak looks like this:
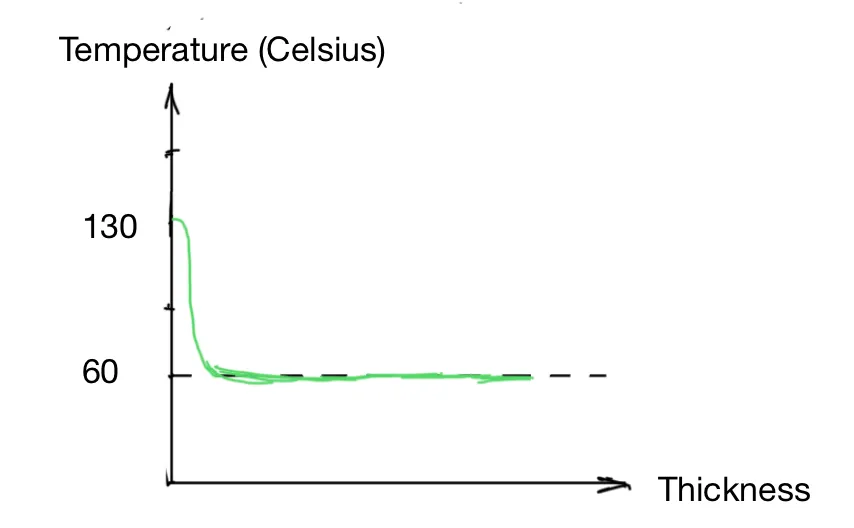
Figure 1: Ideal temperature distribution
It’s not a problem unique to cooking steaks. A lot of cooking is about getting to a desired temperature profile inside the ingredients. It gets more complicated if the internal temperature cannot be easily measured or if different parts of the food behave differently under the same temperature.
The Analysis
Three fundamental physical facts about a piece of steak on a hot pan are:
- The steak will not heat itself from the inside. The heat has to come from outside.
- Heat transfers inside the steak by conduction. The speed of heat conduction is finite, and it’s a property of the steak itself.
- The Fourier law, which states that in conduction, the heat transfer rate (heat flux) is proportional to the temperature difference and the inverse of heat resistance.
According to Fourier’s law, we can increase heat flux either by reducing the heat resistance or by increasing the temperature difference. To reduce heat resistance, we can add oil, which is a good heat conductor. To increase the temperature difference, we should wait until the pan is really hot before we put the meat in it. Another benefit of a really hot pan is that the food will not stick to the pan, partly due to the Leidenfrost effect.
The violent sizzling sound you hear when you drop a piece of steak in a hot pan is the water on the surface of the steak getting vaporized. If you don’t hear anything, that means your pan is not hot enough. However, the sizzling sound should not last too long. If it does, it means there is too much water on the steak. All the evaporation of water takes a lot of energy away, which causes the pan temperature to drop. At that point, you are not searing your steak; you are boiling your steak.
A common misconception is that searing the meat locks in the juice. Last I checked, nobody is making raincoats out of seared meat. Actually, meat juice and soluble proteins continue to leak out of the meat throughout the cooking process. When they run into the hot pan surface, the water evaporates, and the protein coagulates and participates in the Maillard reactions. That’s why you don’t see any liquid. But you will see meat juice on the serving plate when the surface of the steak cools down on the plate.
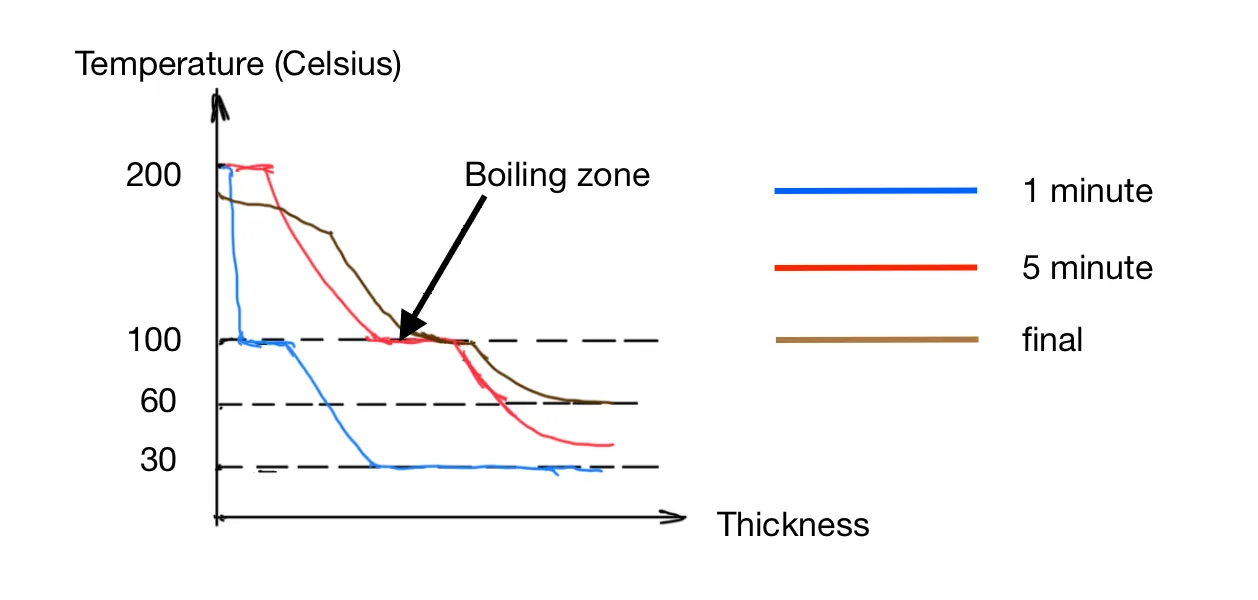
Figure 2: Changing temperature profile
Our goal is not to cook the steak as fast as possible. Our goal is to get the desired temperature profile inside the steak. Assuming the meat starts at 30°C and the pan is at 200°C, a minute after the meat is put in the pan, the temperature profile inside the meat looks like the blue line in Figure 2. All the water at the surface has evaporated, and a thin layer of meat has dried out. The temperature drops as we go deeper into the meat. We then run into a boiling zone, where the water boils and the temperature stays at 100°C. After the boiling zone, the temperature continues to drop.
After a few more minutes, more of the steak is dried out, and the Maillard reactions happen there. The boiling zone moves further inside the steak. Over time, the dried-out zone on the outside gets thicker, and the boiling zone continues to move further inside. This is shown as the red curve in Figure 2.
We want to make sure all the meat is cooked above 60°C, but we want to limit the expansion of the high-temperature/dried-out region to get something like the brown curve in Figure 2. In other words, we want to raise the tail of the red curve while making it less steep. This means we must have a smaller heat flux into the steak. Traditional recipes will ask you to move the steak into a slow oven and let it finish. If you are patient, you can set the oven temperature lower to ensure a smaller heat flux into the steak. How long should you leave it in the oven? Don’t trust any recipe, the oven thermostat, or your own experience. Stick a meat thermometer sideways into the steak and monitor the temperature.
There is a final twist: to achieve your target temperature, you must remove the steak from heat before the internal temperature hits 60°C. The reason is this: when the steak is in the oven, the hottest part is the surface. When the steak is removed from the oven, the heat on the surface can go in one of two directions: it can go inside the steak, or it can go out into the air. It turns out air is not a very good conductor of heat (that’s why the fluffy down comforter keeps you warm), so the residual heat from the surface of the steak will dissipate inwards and continue to cook the inside of the steak. You can easily confirm this by sticking a meat thermometer in your steak and seeing its internal temperature rise. In my kitchen in the summer, the temperature in the middle of the steak keeps rising for up to 15 minutes. Effectively, this is continued gentle cooking.
Unfortunately, relying on the residual heat is neither reliable nor repeatable. How much the temperature rises is different for different pieces of steak in different kitchens. It depends on the humidity of your kitchen, the ambient temperature, and whether there is a draft in your kitchen, among other things.
The steak does not absorb the meat juice when it’s resting. It’s true that if you cut open a piece of hot meat, a lot of juice flows out. But if you wait until it cools down, no juice seems to be flowing when you cut the steak. The real reason is that liquid is more viscous at low temperatures. For instance, water’s viscosity at 80°C is about 1/3 of its viscosity at 20°C. At a lower temperature, gelatin from the meat also forms a gel that further impedes the movement of the juice. That’s why sauces always become thicker between the hot stove and the table.
I suppose if you carefully control the heat, the thickness of the meat, the fat content and water content of the meat, and the timing, you can skip both the low oven step and the resting step to get a good temperature profile. That seems to be what some well-known steakhouses do, according to videos on YouTube.
The Solution
The ultimate result of cooking by heat is a temperature gradient inside the ingredients. Part of the cook’s job is to control the temperature profile by manipulating heat flow. Knowing that doesn’t make you a good cook (far from it), but it is the basic framework for thinking about temperature and heat in cooking, so you can begin to ask the right questions.
Sous vide is so popular with professional chefs because it’s a consistent way to precisely control the temperature of ingredients. We can cook the steak sous vide first, so the whole piece of meat is at exactly the right temperature. We can then sear the surface to get our desired crust and the flavor from Maillard reactions. Modernist Cuisine’s steak recipe directs you to dip the steak in liquid nitrogen after it has been cooked sous vide and before you sear it. I will leave it as an exercise for you to figure out the benefit of the liquid nitrogen dipping step.
The analysis above points to another interesting possibility: what if you cook the steak straight out of the freezer? Now, for the heat to propagate inside, not only will it run into the boiling zone plateau, but it will also run into a melting zone plateau. Water and ice act as natural insulators. You can take your time to sear the exterior without worrying about overcooking the interior. When you are satisfied with the crust, you can then transfer the steak to a low oven. It turns out America’s Test Kitchen has a recipe that does exactly that.
By the way, how do the pros do it? Line cooks at famous steakhouses certainly are not in the habit of touching your steak with their fingers before serving it. They cook so many steaks every day, and they have such consistent control of their meat and oven, that they have developed pretty good intuition about what’s happening inside a steak. In other words, they just know. Almost all problems with home cooks can be reduced to this: you simply don’t have enough experience to know what is happening and what will happen to the food.
Frequently Asked Questions
Do I need to temper the steak to room temperature when I take it out of the fridge?
I don’t think so. Suppose you have a piece of steak that weighs 340 grams (12 oz). You start at 4°C, and you want to cook it so that 10% is crust at 130°C and the other 90% reaches 60°C. Beef is about 75% water. So, to dry out the crust, 25.5 grams of water needs to be vaporized. The specific heat of beef is roughly 3.2 J/g·K. The specific heat capacity of water is 4.18 J/g·K. The latent heat to boil water is 2259 J/g.
Assume room temperature is 25°C. A typical gas burner delivers 15,000 BTU per hour. With 20% efficiency, it delivers 175 Joules per second to the steak. Under these conditions, it takes about 12 minutes to cook a steak starting at 4°C, and about 10 minutes to cook a steak starting at 25°C. Only a difference of 2 minutes.
It’s because the energy needed to vaporize the water in the crust dominates the energy needed to bring the rest of the steak to temperature. Don’t waste time tempering the steak. Monitor the internal temperature of the steak while you brown the surface. If the interior of the steak is not cooked when you are happy with the browning, put the steak in a slow oven to finish cooking. You will save time and get better results.
How often should I flip the steak?
Many people say you should leave the steak alone and flip it only once. Heston Blumenthal’s method is to flip it every 15 seconds. I have tried it both ways. I don’t detect a difference. But one trial in a home kitchen by an amateur cook is hardly a controlled scientific experiment. When experiments are inconclusive, we look to theoretical predictions for guidance.
Three types of boundary conditions are commonly studied in heat transfer theory:
- Constant temperature at the boundary.
- Constant heat flux at the boundary.
- Convection surface as the boundary.
We can assume our stove delivers constant heat output, so the bottom side of the steak that touches the hot pan is under the second boundary condition. The top side is exposed to air, so it’s under the third boundary condition. The steak itself can be modeled as a plane wall. Simulation shows that by turning the steak more often, you get a thinner crust. A bigger percentage of the steak in the middle stays at the ideal temperature. In other words, you get a juicier steak, along with all the wonderful flavor compounds generated by the Maillard reaction.
But that’s assuming you have perfect timing. You can overcook or undercook the steak with either method if you are a couple of minutes off on either side of the ideal time. The real important lesson from the simulation is you should worry more about the internal temperature of the steak than how often you flip it. By the way, as long as your pan is hot enough and you use enough oil, you shouldn’t have a problem with the steak sticking to the pan even if you flip it often.
Grill on fire or pan-seared?
Let me first say, regardless of the taste, the atmosphere of grilling is irreplaceable.
On a grill, the steak mostly receives heat in the form of infrared radiation. In a hot pan, the heat is conducted into the meat. Charcoal burns very hot. Since radiant power is proportional to the fourth power of the surface temperature, charcoal grills deliver much more radiant heat than either a propane fire or a hot pan can. Therefore, you get the best crust on a charcoal grill. As meat juice drops into the fire and gets burnt, many new flavor compounds are created and give your meat the special grill flavor. Make sure after you get the crust, move the steak to the part of the grill that’s not directly on top of the charcoal, and finish cooking the steak with gentle warm air.
The steak seems to turn grey by the sous vide process. Is it ruined?
No. Raw meat is red due to the protein myoglobin. It’s not the same protein that causes blood to be red: that’s hemoglobin. Red juice from raw meat is commonly mistaken for blood. In reality, the blood of animals has been drained at the slaughterhouse to decrease the risk of spoilage. (Turning live animals into meat is a carefully controlled process. Many things can go wrong. For instance, if cows are left in cold rain before being slaughtered, the meat quality will suffer.)
As myoglobin is cooked to around 60°C, the protein denatures and gets oxidized. Its color turns brown. However, color is not a reliable indicator of the meat’s temperature. There are too many variables in the reaction between the pigment, other proteins, and trace elements of different forms of nitrogen. Use a thermometer to be sure.
The grey color is not appetizing, and Maillard reactions did not happen at the sous vide temperature. That’s why all the recipes recommend you sear the meat after sous vide cooking.
Comments
No comments yet. Be the first to share your thoughts!